Monthly Archives: December 2016

HubSpot Synchronization and Deleted Leads

Don’t do this at home.

Our org had about 300,000 Salesforce Leads and around 200,000 HubSpot contacts. The Salesforce Leads had accumulated from 2006 and came from many sources, including previous Marketing Automation systems such as Marketo and Eloqua. For a variety of reasons, we decided to purge from Salesforce the obsolete Leads.

So, here’s what happened:

  • Run Data Loader mass delete job in Salesforce
  • Expect HubSpot to delete the corresponding contacts so the systems stay in sync
  • Discover over the course of a few months that HubSpot emails sent to reps on contact activity (like filling out a form) had broken links to the SFDC lead
  • Moderately annoying to the reps but at some point, sales insisted this be fixed

Analysis

The big reveal was that HubSpot doesn’t delete HubSpot contacts associated with SFDC leads if those contacts aren’t in the SFDC inclusion list!

Here’s an example:

  • Contact fred@foo.com comes into HubSpot from some form.
  • HubSpot adds contact to inclusion list (because form completed).
  • HubSpot contact syncs to Salesforce as a new Lead.
  • Sales marks lead with status Bogus Data.
  • HubSpot picks up change in status on next sync but ….
  • Because inclusion list rules say, exclude Status = Bogus Data, the contact is removed from the inclusion list. HubSpot maintains, as a property of the contact, the SFDC Lead Id in case the contact re-enters the inclusion list filter.
  • Salesforce mass delete removes the fred@foo.com Lead.
  • Because the SFDC Lead is no longer in the inclusion list, the delete event is not recognized by HubSpot and contact remains in HubSpot. The HubSpot contact is an orphan from the point of view of synchronization.

Remedies
We’re still exploring this but I believe the conceptual answer should be:

  1. If the HubSpot contact is ever sync’d to Salesforce, the contact should remain in the inclusion list. Thus, deletes from the Salesforce side will be deleted in HubSpot.
  2. Use HubSpot smart lists to filter out contacts marked as disqualified or bogus data or otherwise not worth engaging in new campaigns.
  3. Run periodic (monthly) Salesforce batch jobs to delete Leads that are bogus/spam after x days of existence
  4. Don’t delete from HubSpot as a HubSpot delete won’t delete in Salesforce, leaving you with an unbalanced system
  5. Make your inclusion list rules succinct – they need to be readable on one page, without scrolling

Custom domain – Napili Community Template

This post written to address a confusing point in the documentation.

Let’s say you want to create a custom domain name for your Community based on the Napili template. You desire https://customers.foo.com.

Stumbling block number One

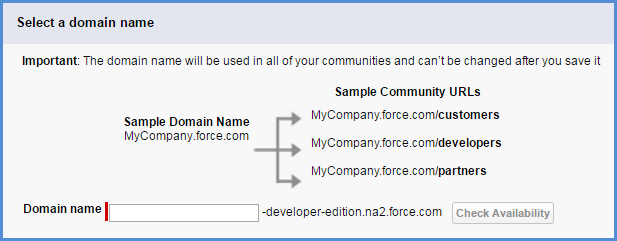
When enabling Communities in an org (and custom domains are only available in PROD), you get this screen:
communities-enablement

(screen shot is from Dev Edition so PROD will be slightly different in the default URL)

Your eyes feast on the “Important: The domain name will be used in all of your communities and can’t be changed after you save it”. But you want your community to be called customers.foo.com with no force.com in the domain at all. You get scared.

RELAX. Typically, you will use your company name, say foo, in the entry box. Think of this as the master URL for all your communities (up to 50) that Salesforce needs to host your communities. It isn’t until later that you will bind your Community to its custom domain and then to the master URL

Stumbling block number Two
When building a Community, say with the Napili template, where do you define the custom domain name?

ANSWER: You don’t. Just give your Community a good label to distinguish it from any other Communities you might create. The Community setup process prompts you for an optional suffix for your Community URL. And this URL uses a force.com domain as in foo.na2.force.com. Still not a custom domain. RELAX.

And here’s the secret sauce how it all comes together

Salesforce doesn’t make things easy with a wealth of terminology, some of which doesn’t seem to apply for the poor Napili template customizer. But the key thing to remember is that Napili-template Communities are Sites. That is, Sites with a capital S.

So step 1 to the Custom Domain (actually steps 1-4) are described in excellent detail in this Knowledge Article.

  1. Update your DNS Server With Your Custom Domain
  2. Create a Certificate Signing Request & Obtain an SSL Certificate for your domain
  3. Update your signed SSL certificate in Salesforce.
  4. Create a Custom Domain in Salesforce. Note that Communities has to be enabled in your PROD org to finish this step as you won’t be able to assign the certificate to the custom domain until Communities is enabled. Hence, previous comments above re: relaxing

At this point you are almost there. All that is left is binding your Community to the custom domain.

Go to Domains Management | Domains. The custom domain you created in step 4 above (customers.foo.com) will appear here with the attached certificate/key. Select the custom domain. Click New Custom URL.
custom-domain-custom-url

The domain field is prepopulated as you would expect but what value goes into Site? Well, it is a lookup field so click the spyglass and, YES, you will see your Community in the list of available Sites. Select it and save. Your Community is now bound to the custom domain that is bound to the Community as hosted in Salesforce under a force.com domain name.

So, what’s happening under the hood?

  1. Your Community is hosted at Salesforce hence it has a force.com domain
  2. You define an alias in DNS (the CNAME entry) between your custom domain name and a domain name that Salesforce works with that includes your orgId. In this example, customers.foo.com is aliased to customers.foo.com.yourorgId.live.siteforce.com. Full details on how CNAME works can be found in many places such as here.
  3. When your users visit customers.foo.com the actual request via DNS goes to customers.foo.com.yourorgId.live.siteforce.com. Salesforce uses the binding between your custom domain and the Site (i.e. your published/activated Community) to find and render the pages of your community – the one you maintain in Community Builder. But the URL shown on the browser is what you want.

Pro tip:

Turns out you can migrate Communities from sandboxes to PROD with Changesets. Not every setting is copied but your pages will be. In the Changeset list of components, select Sites.com. A list of Communities will appear to choose from. See, knowing that Communities are Sites comes in handy.