Analytic Snapshot and Process Builder

Can the target object of an Analytic Snapshot be the target object of a Process Builder flow?

NO

The documentation states that workflows aren’t allowed but is silent on Process Builder.

Target object must not be included in a workflow.
The custom object in the Target Object field is included in a workflow. Choose a target object that is not included in a workflow.

I was trying to set a RecordTypeId after each snapshot record was created using values in the SObject. The only way to do this (as triggers aren’t supported either) is via a scheduled Apex job

HubSpot Synchronization and Deleted Leads

Don’t do this at home.

Our org had about 300,000 Salesforce Leads and around 200,000 HubSpot contacts. The Salesforce Leads had accumulated from 2006 and came from many sources, including previous Marketing Automation systems such as Marketo and Eloqua. For a variety of reasons, we decided to purge from Salesforce the obsolete Leads.

So, here’s what happened:

  • Run Data Loader mass delete job in Salesforce
  • Expect HubSpot to delete the corresponding contacts so the systems stay in sync
  • Discover over the course of a few months that HubSpot emails sent to reps on contact activity (like filling out a form) had broken links to the SFDC lead
  • Moderately annoying to the reps but at some point, sales insisted this be fixed

Analysis

The big reveal was that HubSpot doesn’t delete HubSpot contacts associated with SFDC leads if those contacts aren’t in the SFDC inclusion list!

Here’s an example:

  • Contact fred@foo.com comes into HubSpot from some form.
  • HubSpot adds contact to inclusion list (because form completed).
  • HubSpot contact syncs to Salesforce as a new Lead.
  • Sales marks lead with status Bogus Data.
  • HubSpot picks up change in status on next sync but ….
  • Because inclusion list rules say, exclude Status = Bogus Data, the contact is removed from the inclusion list. HubSpot maintains, as a property of the contact, the SFDC Lead Id in case the contact re-enters the inclusion list filter.
  • Salesforce mass delete removes the fred@foo.com Lead.
  • Because the SFDC Lead is no longer in the inclusion list, the delete event is not recognized by HubSpot and contact remains in HubSpot. The HubSpot contact is an orphan from the point of view of synchronization.

Remedies
We’re still exploring this but I believe the conceptual answer should be:

  1. If the HubSpot contact is ever sync’d to Salesforce, the contact should remain in the inclusion list. Thus, deletes from the Salesforce side will be deleted in HubSpot.
  2. Use HubSpot smart lists to filter out contacts marked as disqualified or bogus data or otherwise not worth engaging in new campaigns.
  3. Run periodic (monthly) Salesforce batch jobs to delete Leads that are bogus/spam after x days of existence
  4. Don’t delete from HubSpot as a HubSpot delete won’t delete in Salesforce, leaving you with an unbalanced system
  5. Make your inclusion list rules succinct – they need to be readable on one page, without scrolling

Custom domain – Napili Community Template

This post written to address a confusing point in the documentation.

Let’s say you want to create a custom domain name for your Community based on the Napili template. You desire https://customers.foo.com.

Stumbling block number One

When enabling Communities in an org (and custom domains are only available in PROD), you get this screen:
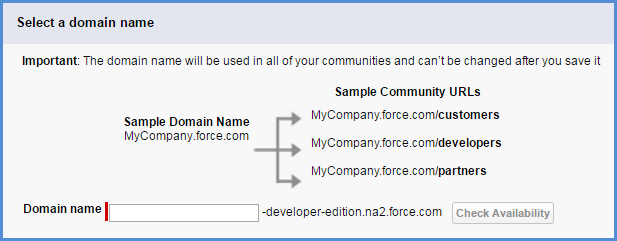
communities-enablement

(screen shot is from Dev Edition so PROD will be slightly different in the default URL)

Your eyes feast on the “Important: The domain name will be used in all of your communities and can’t be changed after you save it”. But you want your community to be called customers.foo.com with no force.com in the domain at all. You get scared.

RELAX. Typically, you will use your company name, say foo, in the entry box. Think of this as the master URL for all your communities (up to 50) that Salesforce needs to host your communities. It isn’t until later that you will bind your Community to its custom domain and then to the master URL

Stumbling block number Two
When building a Community, say with the Napili template, where do you define the custom domain name?

ANSWER: You don’t. Just give your Community a good label to distinguish it from any other Communities you might create. The Community setup process prompts you for an optional suffix for your Community URL. And this URL uses a force.com domain as in foo.na2.force.com. Still not a custom domain. RELAX.

And here’s the secret sauce how it all comes together

Salesforce doesn’t make things easy with a wealth of terminology, some of which doesn’t seem to apply for the poor Napili template customizer. But the key thing to remember is that Napili-template Communities are Sites. That is, Sites with a capital S.

So step 1 to the Custom Domain (actually steps 1-4) are described in excellent detail in this Knowledge Article.

  1. Update your DNS Server With Your Custom Domain
  2. Create a Certificate Signing Request & Obtain an SSL Certificate for your domain
  3. Update your signed SSL certificate in Salesforce.
  4. Create a Custom Domain in Salesforce. Note that Communities has to be enabled in your PROD org to finish this step as you won’t be able to assign the certificate to the custom domain until Communities is enabled. Hence, previous comments above re: relaxing

At this point you are almost there. All that is left is binding your Community to the custom domain.

Go to Domains Management | Domains. The custom domain you created in step 4 above (customers.foo.com) will appear here with the attached certificate/key. Select the custom domain. Click New Custom URL.
custom-domain-custom-url

The domain field is prepopulated as you would expect but what value goes into Site? Well, it is a lookup field so click the spyglass and, YES, you will see your Community in the list of available Sites. Select it and save. Your Community is now bound to the custom domain that is bound to the Community as hosted in Salesforce under a force.com domain name.

So, what’s happening under the hood?

  1. Your Community is hosted at Salesforce hence it has a force.com domain
  2. You define an alias in DNS (the CNAME entry) between your custom domain name and a domain name that Salesforce works with that includes your orgId. In this example, customers.foo.com is aliased to customers.foo.com.yourorgId.live.siteforce.com. Full details on how CNAME works can be found in many places such as here.
  3. When your users visit customers.foo.com the actual request via DNS goes to customers.foo.com.yourorgId.live.siteforce.com. Salesforce uses the binding between your custom domain and the Site (i.e. your published/activated Community) to find and render the pages of your community – the one you maintain in Community Builder. But the URL shown on the browser is what you want.

Pro tip:

Turns out you can migrate Communities from sandboxes to PROD with Changesets. Not every setting is copied but your pages will be. In the Changeset list of components, select Sites.com. A list of Communities will appear to choose from. See, knowing that Communities are Sites comes in handy.

Schedulable Jobs – Constructors and execute()

This issue threw me for a loop for some time.

Suppose you have a Schedulable class and when it runs, the behavior of the execute() method doesn’t match what you expect. It looks like there’s memory of previous execute()s

Here is a specific example that distills the issue

public class MySchedulable implements Schedulable {

   Account[] accts = new List<Account>();

   public void execute(SchedulableContext sc) {
      accts.addAll([select id, name from Account where YTD_Total__c < 1000.0]);
      // do something interesting with this 
   }

You run the job weekly. You observe on week n, where n > 1, that Accounts are being processed that currently don’t have a YTD_Total__c < 1000. Accounts with YTD_Total__c > 1000 are being processed (?!?)

Explanation

  • When the job is scheduled, the class constructor is called (here, the implicit constructor) and the object variable accts is initialized empty.
  • On week 1, when execute() is called, the accounts with YTD_Total__c < 1000 as of week 1 are added to list accts.
  • On week 2, when execute() is called, the accounts with YTD_Total__c < 1000 as of week 2 are added to list accts.

Note that the class constructor is not reinvoked for each execute(). Hence, the accts list grows and grows.

Solution
Reinitialize all object variables within the execute().

public class MySchedulable implements Schedulable {
 
   public void execute(SchedulableContext sc) {
      Account[] accts = new List<Account>();
      accts.addAll([select id, name from Account where YTD_Total__c < 1000.0]);
      // do something interesting with this 
   }

Email2Case with recordTypes

This was annoying and worth documenting

Starting conditions

  • Record types defined on Case.
  • Email2Case configured with email address support@foo.com using RecordType A and email address orders@foo.com using RecordType B.
  • RecordType A is the default record type for the automated case user (as configured in Case Settings).
  • Automated Case User’s profile has access to both RecordType A and RecordType B.

You start testing

Since it typically requires liaison with your mail server team to establish the email addresses, verify-to-Salesforce their validity, and then auto-forward the email to the Salesforce email services address (e.g. verylongname@salesforce.com), you will be tempted during testing to try sending emails to verylongname@salesforce.com as this is what Salesforce actually would receive.

You will be surprised.

If the email you send to is for the Automated Case User’s profile’s non-default recordtype, then the recordType assigned to the Case will be the default record type (!?!). This happens in either of the following circumstances:

  • Email-to-case address is not verified, or ..
  • Email-to-case address is verified

That is, in order to get the correct recordType assigned, you have to send the email to your company’s email domain and have that email forwarded to Salesforce.

Example:

  • RecordType A is default recordType for Automated Case User
  • Email-to-Case address orders@foo.com is configured to use RecordType B
  • Email-to-Case address orders@foo.com is associated to orders-verylongname@salesforce.com

Results:

  • Send email to orders-verylongname@salesforce.com. Result: Case created with recordType A ?!?
  • Verify orders@foo.com and send email to orders-verylongname@salesforce.com. Result: Case created with recordType A ?!?
  • Establish forwarding rules in your mail server that forward orders@foo.com to orders-verylongname@salesforce.com. Send email to orders@foo.com. Result: Case created with recordType B Hooray!

Email Services Forwarding Verification From Gmail

Minor trip up today

I set up an Inbound Email Service in PROD. Email address (friendly) was foo@bar.com. “bar.com” uses Gmail as corporate email system. As you know, you need to forward the emails received at fooo@bar.com to foo@verylongemailaddress.pod.apex.salesforce.com.

When the forwarding is done by Gmail, it sends a confirmation code requesting verification of the forwarding before Gmail will enable.

Where do you see this confirmation code?

There’s no mailbox to look at in Salesforce. So, what I did was code a super class for my Inbound Email Handler class that had a method log(..):

    public virtual void log(Messaging.inboundEmail email,Messaging.InboundEnvelope env) {
    
    	System.debug(LoggingLevel.INFO,'\n INboundEmail Envelope:\n' + 'from:' + env.fromAddress + ' to: ' + env.toAddress + '\n' +
    		'\n  subject    :' + email.subject +
    		'\n  ccAddresses:' + email.ccAddresses +
    		'\n  toAddresses:' + email.toAddresses +
    		'\n  fromAddress:' + email.fromAddress +
    		'\n  fromName   :' + email.fromName +
    		'\n  headers    :' + '\n' + headersToString(email.headers) +
    		
    		'\n  #binAtch:' + (email.binaryAttachments != null ? email.binaryAttachments.size() : 0) +
    		'\n  #textAtch:' + (email.textAttachments != null ? email.textAttachments.size() : 0) +
    		
    		'\n  plaintextBody:' + email.plainTextBody +
    		'\n  htmlBody:' + email.htmlBody
    	);

I invoked this method in the InboundEmailHandler (called Email2Lead in this use case) so every message would be logged

public Email2Lead() {
    	super();
}
    
public Messaging.InboundEmailResult handleInboundEmail(Messaging.InboundEmail email,Messaging.InboundEnvelope env) {
    	Messaging.InboundEmailResult	res 	= new Messaging.InboundEmailResult();
    log(email,env);
    ... do work here ..		
    res.success = true;
    return res;
}

So, turn on debug log for the context user of the Inbound Email Service, use Gmail to send the confirmation request of the forwarding rule, and then inspect your debug log in the value of the plaintextbody debug line

What if you don’t get the confirmation code?

The most likely reason is that your Inbound Email Service is configured to only accept emails from certain domains. This list of domains needs to include google.com as that is the source of the confirmation code for the forwarding rule. The source is not your corporate mail system (e.g. bar.com)

SObject method isClone() Nuance

Discovered something doing a unit test today

SObject class method isClone() does not return true unless the clone source SObject exists in the database.

Account a = new Account(name = '00clonesrc');
insert a;
Account aClone = a.clone(false,true,false,false);
system.debug(LoggingLevel.Info,'isClone='+aClone.isClone());

The debug line shows as: isClone=true

but, don’t do the insert as in this example:

Account a = new Account(name = '00clonesrc');
Account aClone = a.clone(false,true,false,false);
system.debug(LoggingLevel.Info,'isClone='+aClone.isClone());

The debug line shows as: isClone=false

Normally, this might not be an issue but I was unit testing a service layer method and passing cloned sobjects in as arguments without doing the database operation in order to make the tests run faster. This is one place where the DML is required in order to get isClone() to work as expected.

Update 2016-10-04

Per suggestion by Adrian Larson, I retried using a dummy ID

Account a = new Account(id = '001000000000000000', name = '00clonesrc');
Account aClone = a.clone(false,true,false,false);
system.debug(LoggingLevel.Info,'isClone='+aClone.isClone());

The debug line shows as: isClone=true

Duplicate Rule Woes

A long time ago, I implemented duplicate checking in Apex for custom object Foo__c. I decided it was time to use SFDC’s out-of-the-box Duplicate Rules so I could move the logic into point-and-click configuration and clean up the code.

Good idea eh?

Well, sort of. There are some considerations before you jump into this.

Starting condition:
My existing Apex logic checked for duplicates intrabatch as well as extrabatch. Meaning, if two Foo__c‘s with the same key appeared in the same trigger set, they were both flagged as duplicate errors. Similarly, if any Foo__c within the batch matched an existing Foo__c outside of the batch, it would be flagged as an error.

Consideration (coding)

  • Unfortunately, SFDC duplicate rules won’t block intrabatch duplicates. This is documented in the Help
  • Doubly unfortunate, once you insert in a batch duplicate Foos, if you edit one of the duplicate Foos without changing the matching key field, SFDC won’t check it against the other Foo with the same key. For example, if you bulk uploaded in one batch two Foos, each with key ‘Bar’, SFDC doesn’t detect duplicates. When you go to edit one of the Foos with key ‘Bar’ and change any field other than the matching key, SFDC won’t tell you that Foo i with key ‘Bar’ is the same as existing Foo j with key ‘Bar’.

That said, you do get to eliminate any Apex code that does SOQL to check for duplicates extrabatch.

Workaround
If you really want to block Foos with the same key from getting into the database, you have to implement in your domain layer (i.e. trigger), Apex verification. No SOQL is required because all the records that have to be checked will be in Trigger.new

Consideration (deployment)
As of V37.0 (Summer 16), there is no way to deploy Duplicate Rules through ant or Change Sets. You have to manually add the Duplicate Rules in your target orgs. You can deploy MatchingRules via ant or Change Sets but that won’t do you much good as they have to be bound to a Duplicate Rule. There is an Idea worth voting up.

Rapid compare of two lists in Excel

The business problem was to mass delete Leads from Salesforce to cause a corresponding mass delete from HubSpot. The business wanted to know how many of the planned SFDC deletions were in the HubSpot SFDC sync inclusion list. The lists were very large (> 100,000)

  1. Export SFDC leads to be deleted – with email column in export
  2. Export HubSpot contacts in the SFDC integration settings inclusion list
  3. Create a new Excel workbook and place the Hubspot emails into column A and the SFDC emails in column B
  4. In column C, Write a VLOOKUP of value in column B to see if in column A, if not, error
  5. Count the non error cells in column C

Not so fast pard’ner!

Literally, Excel VLOOKUP exact match (4th argument set to false) is really sloooooowwwwwww on large spreadsheets. So, instead, you have to use VLOOKUP twice but with approximate matching and sorted lists.

Step 1 – sort (only) Column A, then sort (only) Column B
Step 2 – in cell C2, the Excel formula is (remember – HubSpot data is in column A, SFDC data in column B):

=IF(VLOOKUP(B2,$A:$A,1,TRUE)=B2, VLOOKUP(B2,$A:$A,1,TRUE), NA()) and then copy the formula down for all rows in column B (SFDC leads).

This runs lightning fast (the alternative VLOOKUP exact match would be in the minutes on a 64 bit quad processor 32 GB Windows 7 machine).

Why does this work so well?
When VLOOKUP uses approximate matching on sorted lists, it stops once it finds the match (or the very next value). So, the IF condition tests to see if VLOOKUP returns the same value as the lookup key, if yes, the true condition simply returns the lookup results again – because we know it was an exact match. If false, return the #N/A value because we know it was not an equal match.

Now, I could have done this faster with the following:

=IF(VLOOKUP(B2,$A:$A,1,TRUE)=B2, B2, NA())

This is because the result column is the same as the lookup column. The second VLOOKUP can be used to return any column from the search array by varying the third argument. I leave the two VLOOKUPs in for future proofing the general fast VLOOKUP technique on other tables.

Rerender custom component after main page inlineEdit Save

Sounds simple. You have a Visualforce (VF) page with apex:detail and a custom component. You want to rerender the custom component after the inlineEdit Save command completes. The VF markup is trivial:

<apex:page standardController="Account">
  <apex:form >
      <c:MyComponent id="theComponent" someArg="false"/>  
      <apex:detail inlineEdit="true" subject="{!Account}" rerender="theComponent"/>
  </apex:form>
</apex:page>

So, this works great except …. if someArg is used to conditionally render a table row or column. Such as in this example:

<apex:component >
    <apex:attribute name="someArg" type="Boolean" required="false" default="false" description="TRUE if component not part of export"/>
    <table>
      <thead>
        <apex:outputPanel rendered="{!NOT(someArg)}">
          <tr id="headerRow">
            <th><apex:outputText value="Column 1 Now: {!NOW()}"/></th>
            <th><apex:outputText value="Column 2 NotSomeArg"/></th>
          </tr> 
        </apex:outputPanel>    
        <apex:outputPanel rendered="{!someArg}">
          <tr>
            <th><apex:outputText value="Column 1 Now: {!NOW()}"/></th>
            <th><apex:outputText value="Column 2 someArg"/></th>    
          </tr>
        </apex:outputPanel>
      </thead>    
    </table>                                                                                           
</apex:component>

The problem
I had a pretty sophisticated component that sometimes rendered 9 columns and sometimes 11 columns in an HTML table, depending on the value of someArg. This works well on initial page load. When the business requirements changed and I needed to rerender the component after inlineEdit save, the rerender action failed. In fact failed hard – leaving blank spaces in the table header and no table rows.

After spending way too much time thinking it was something about inlineEdit and components, other arguments not being passed, or something in the component’s controller, I stumbled upon this sentence in the documentation (something I knew about already but because the component was so sophisticated and was a component, I didn’t think applied).

You cannot use the reRender attribute to update content in a table.

The solution?
No good answers here.

  1. You have to refactor your component so that you either have two components, one for x columns and one for y columns, sharing subcomponents to avoid duplication or …
  2. rethink your design or …
  3. after inlineEdit completes, reload the entire page. oncomplete="location.replace();". I tried this but the user experience was poor, as first inline edit does its Ajax refresh and all looks fine, and then the page reloads. Since this is contrary to the way other pages in Salesforce refresh after inlineEdit Save, I eschewed this option.

Side Note
Here’s a tip when you’re stuck with a complex piece of code that no longer is working for some inexplicable reason: Rebuild the code from its most elementary pieces in your Dev Edition so you have a working version, then add in the suspect bits one at a time until it fails. Try and avoid your custom objects an customizations, reproduce using the OOB Account object or the like. A side benefit if you do this is that if you’re really stuck, you’ll have a short, self-contained, compilable example (SSCCE) – suitable for publishing on a forum for community assistance.